QuestionI recently purchased one of these boards and need to know how to put her together,Can u help me????
Answer
 Windsurfer
Hey Larry & Leisa,
I get this question often so I have a basic rigging script already set up. Some instructions may not apply but it covers everything. At the bottom is how to rig a non-clamp on type boom.
You can also go to YouTube and search for windsurfing rigging for a variety of videos. Watch some of them for some good rigging tips and fine tuning of sails.
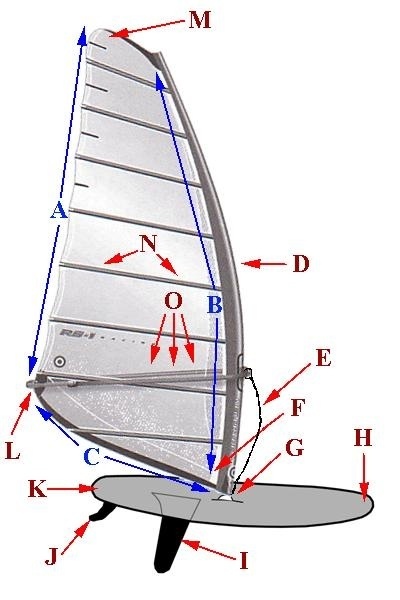
I'm also adding an image that shows all the basic parts of a windsurfing rig. Just match the letters & names to the image. You should be able to print the image and then write the names so you have a hard copy to reference to. Once you have your hard copy, here is how to assemble the parts.
Lay out the sail just as the image shows, mast to the right, outhaul to the left. Slide the mast into the mast sleeve and be sure to have the mast showing in the opening where the boom attaches. Now find the mast base and extension. The base is the part with the black rubber hourglass or commonly known as the universal joint. There may/should be an extension for the base. It will be long cylinder with holes and a rope. Slide the extension into the mast and using the rope, you will rig the downhaul of the sail. There will be a grommet on the bottom of the sail. Loop the rope up through the grommet coming from underneath the sail. Loop the rope back down through the pulley on the extension, back up through the grommet the same as before, back down through the extension into the hole with the cleat. Pull the rope snug to remove most of the wrinkles out of the mast sleeve and lock the rope in the cleat. You may need to adjust the extension so that you can get enough tension on the sail. With the wrinkles out of the mast sleeve, there should be about 6-8 inches of space from the grommet to the cleat.
Now clamp the boom onto the mast. There is a top and bottom to the boom. Look for adjustment holes on the clew end of the boom. These holes should always be down to allow water to drain out. Now go to the clew/outhaul end of the boom. There will be a rope that will loop from under the sail, through the grommet, back through a pulley, through the grommet and then through a hole to the cleat. You may need to adjust the boom length to get enough outhaul on the sail. Set the boom length so that there is about 4-6 inches of space and rig the outhaul.
Now go back to the downhaul. Using the mast base (u-joint), wrap the downhaul rope around the u-joint about three or four times with about 6 inches of space from the cleat to the u-joint. Now place your right foot on the bottom of the extension and pull on the rope. Watch the top of the sail and as the mast is bending, look for the top 1 or 2 battens to be moving away from the mast. The head of the sail will start drooping as the battens pull away from the mast. If you can't get this drooping before the grommet is about 1 inch from the cleat, release the rope and readjust the extension accordingly. Once you have the downhaul set, now go to the end of the boom and release the outhaul. Adjust the boom length so that there is about 2-4 inches from the grommet. Rig the ropes and pull the outhaul. The sail should not be touching the boom but it doesn't need to be really tight either. The outhaul is just giving the sail some shape to keep the draft stable.
Once you have the downhaul and outhaul set, tidy up the ropes this way. For the downhaul, loop the rope around the loops that go through the grommet and extension pulley and tie a snug half hitch. This will prevent the rope from slipping back through the cleat and losing your downhaul when on the water. Most cleats won't slip but this is like a putting on a safety belt. Better to not allow slippage as retightening out on the water is almost impossible. Now feed the excess rope into one of the holes in the extension. This keeps the excess rope from flailing around on the board and getting in the way of your feet. There should be a mast pad that will go over the bottom of the mast. This protects the board from the mast when the sail is down. It should be fairly easy to figure out how it goes on. For the outhaul rope, just loop the rope aound the boom and make another half hitch. Keep making half hitches until the excess is gone. You can also make a small single loop knot on the end of the rope an slide it to your last half hitch to keep the rope from flailing around. There should also be a pad for the nose of your boom (where the boom attaches to the mast). This pad will help prevent board damage if the nose of the boom hits the nose or tail of the board. If you don't have one of these, they are readily available at your local shop or online. I've referenced an online instruction site that also has 'links' to online shops.
To attach the mast/sail to the board, take the mast base and loosen the slider nut on the bottom of the base. Look for the wider opening in the mast track and place the base into the track. If it won't slide forward, loosen the nut some more. Slide the base forward to about 1/4 the way from the front. Tighten the base fairly tight. You don't want it slipping while on the water. Take the sail to the water and then the board. Tip the board up on it's side and place the extension into the mast base ensuring that the pins are both locked in. You are ready to sail.
If the fin is not on the board, it is fairly self explanatory. If there is no adjustment available, then just put the fin in and tighten the screw. If you have an older type fin box, there will be a pin on the back of the fin and a screw/nut on the front tab of the fin. Remove the screw/nut and slip the pin into the fin box at the wide point and slide the fin to the back of the slot. Now lay the nut down into the slot and move it back to about an inch from the opening. Move the fin forward so that the tab is close to the nut. Using your screwdriver, push the nut back to line it up with the hole in the tab and put the screw into the nut. Tighten very securely. You may need to push on the back of the fin to get it down snug and retighten the nut. When pushing on the back of the fin, use a folded towel or similar padding so as to not damage the trailing edge of the fin.
As for adjustments for sailing, boom height should be about pecs to shoulder height when the sail is attached to the board and you are standing straight up. Maybe just a bit higher for light winds. Rule of thumb for mast and fin locations, both forward for lightwinds, move both back as winds increase. Mast adjustment should be about 1 inch at a time, fin should be about 1/4-1/2" at a time.
A - Leach - Main power area of sail
B - Luff - Trailing edge of sail
C - Clew - Bottom edge of sail
D - Mast/Mast sleeve - Where the mast goes into the sail
E - Uphaul - Rope on boom end for pulling the sail out of the water
F - Downhaul - Where the extension rope goes through the grommet, tightens the leach of the sail
G - Mast foot - Connects the mast/extension to the board
H - Bow - Nose or front of the board
I - Daggerboard - Also called the centerboard. Not all boards have them. Found on beginner and course racing boards.
J - Fin - Basically the rudder of the board
K - Stern - Tail or back of the board
L - Clew/Outhaul - Where the outhaul of the sail happens
M - Head - Top of the sail
N - Battens - These add shape and stiffness to the sail to help create power
O - Boom - The handle of the rig. Allows you to hold the sail up and steer the board
If by chance you have an older style tie on boom, here are instructions on getting your boom and sail rigged.
Stand the mast up and hold it close to you. At the point where it is level with your sternum grab the mast with one hand and line up your thumb with your sternum. Lay the mast down holding onto the marked spot. You will be tying the rope on just above the point where your thumb is.
Now take your rope and make a loop with it, lining up the ends of the rope. Now loop the rope around the mast and thread the ends through the loop. Do this again so that you have two loops around the mast and the ends are through the loop. Snug the rope against the loop ensuring that the loops around the mast are laying flat to the mast and not crossing except at the rope loop.
Now take your boom and determine side should be on top. For all booms, where the adjustment pins and holes are on the tail, these should always down to allow water to drain. Slide the tail of the boom over the mast and work the boom head down to the rope on the mast. The mast should be under the boom head and over the tail of the boom and the boom should be laying parallel to the mast. There should be two holes in the boom head. Thread one of the two rope ends through each of the holes. Now tie a square knot in the ropes. Square knot is - With a rope in each hand, put right hand rope over left and loop (just like tying your shoes), then take left hand rope over the right and loop (just like tying your shoes only backwards) (unless your are a lefty and you do it opposite :)
Tighten the knot.
Now grab the mast above the boom with your right hand and lift. Grab the boom about 18" from the mast with your left and swing the boom away from the mast. The rope should be tightening and wedging the boom to the mast. If it feels too tight, back up and loosen the knot a bit. If you get the boom to where you are able to connect the outhaul and it is loose, back up and tighten the knot.
Hope this helps.
Keep on sailing,
Windlover


