 Using Video to analyze and improve your golf swing is the essence of being a serious student of the game. Attempting to tackle the golf swing without taking advantage of video technology is a tremendous handicap. In fact, there's no question in my mind that one of the main reasons we're seeing so many young superstars in golf today is the use of video analysis. The ability to actually see what's happening, and not having to rely on feel, accelerates the learning process immeasurably. Video not only holds the instructor partially accountable for the student's progress, but also puts more responsibility on the student to actually practice and attempt to improve his or her technique. To borrow a saying from Homer Kelly (author of The Golfing Machine), it's the blind struggle versus the guided one.
The only real tools you'll need to successfully videotape your golf swing are a tripod and a camera. VHS cameras work well, as do digital cameras. Of course, digital cameras give you the added benefit of allowing for computer-aided analysis, but that's not absolutely necessary. As long as your camera has a high-speed shutter setting, 1__ã2000 sec. or the like, you'll be fine._Ê
To begin, set the camera at a height slightly above your navel and prepare to shoot yourself from the down-the-line angle. To properly position the camera, take a comfortable setup; then, lay a club on the ground facing the target and along the line your hands will travel during the swing (perpendicular to your feet). Walk approximately six paces behind you and aim the camera so the club is basically in the middle of the frame when you look through the viewfinder. This position will give you a solid view of the golf swing. _Ê Things To Look For: In preparation for analysis, you need to create a template on your TV screen using a dry-erase pen. It's easy, and all you really need are three lines (for a down-the-line view), one vertical line from the top of the buttocks to the ground, one short vertical line just in front of the knees, and one line tracing the shaft of the club, running from the golf ball through the body and beyond (see photo, bottom right).
Once you have this template, you're ready to begin. The seven positions you'll want to monitor are setup, takeaway, halfway back, the top, delivery, impact and release. These positions represent critical parts of the golf swing and should be worked on regularly if you're serious about improving.
Down-Target View _Ê Address: In the address position, there are several things to look for. First, a line that's drawn vertically down from the front of the shoulders should run through the right index finger. This will ensure the hands aren't too close or too far away from the ball. Next, a line drawn from the top of the head to the middle of the right hip should be perpendicular to the clubshaft. Achieving this position ensures that your spine angle is correct. This angle should be maintained throughout the swing. While the shoulders can be slightly rounded at setup, the small of the back should be flat.
 Takeaway: The right half of the buttocks should remain against the line of the template while the right hip moves slightly to the inside. The clubhead should move directly up the diagonal template line, while the butt of the club remains pointed at the navel. The upper-left arm should remain connected to the body, while the left hand remains hidden behind the right. The key is to dominate the takeaway with the body, not the hands and arms. Developing this type of takeaway will help keep your swing smooth and synchronized._Ê
 Halfway Back: The buttocks should still be against the line, while the right knee is moving away from its original position. The clubshaft is now more upright than at setup, as illustrated by its relationship to the line drawn to the ball along the original shaft line. This position helps create a shallow plane on the downswing, which almost all good players have. Also, notice that the right elbow is slightly higher than the left. This helps to create the proper downswing path and prevents the left wrist from cupping excessively.
 At The Top: The buttocks should still be against the vertical line. The outside of the left arm is parallel to the shaft line at setup and the leading edge of the clubface is parallel to both the left arm and the shaft line. This creates a very neutral, top-of-the-backswing position, which is critical for straight shots. Other good indications of a neutral top position are the club being parallel to the club on the ground (used for alignment), the inside of the right forearm is parallel to the outside of the body, and the right elbow is slightly higher than the left._Ê
 Delivery: The buttocks remain against the vertical line, while the knees have pulled back away from the line they started against. This ensures that the body remains away from the ball, giving the arms the proper space to move freely. The clubshaft is now parallel to the shaft line established at setup, which keeps the club attacking the ball at the proper angle and from the proper direction. The clubface should be square, hanging perpendicular to the ground while the upper body remains pitched at the same angle it started.
 Impact: The buttocks are still against the line, yet have moved slightly left of where they were at address. The right knee remains behind the line it started against, giving the arms and club plenty of room to extend through impact, a huge source of power and consistency. The clubshaft is slightly more upright than it was at setup, the result of the shift of the body to the target and the slight increase in side bend at impact. A straight line is present between the clubshaft and the right forearm._Ê
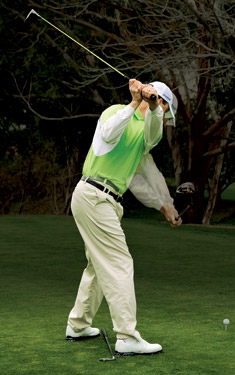
 Release: The lower body remains in its lane established at setup while the club goes by. This gives more room for the arms to extend and create power. The butt end of the club is still pointed at the navel, illustrating how the arms and the body work in sync during the swing. The leading edge of the clubface is square, perpendicular to the ground, and there's still space between the hands and the body. This demonstrates the proper extension through the ball and a release of stored energy.
_Ê
Release: The lower body remains in its lane established at setup while the club goes by. This gives more room for the arms to extend and create power. The butt end of the club is still pointed at the navel, illustrating how the arms and the body work in sync during the swing. The leading edge of the clubface is square, perpendicular to the ground, and there's still space between the hands and the body. This demonstrates the proper extension through the ball and a release of stored energy.
_Ê
Face-On View
_Ê
 Address: In the face-on view, the vertical line on the left of the screen runs from the right shoulder to the ground, while the vertical line on the right side of the screen runs through both the left shoulder and the left leg. This illustrates the proper spine tilt, which will allow the shoulders to rotate on the proper plane. Notice that a line drawn straight up from the ball runs through the emblem on the shirt– this indicates the proper ball position for an iron. The shaft should be perpendicular to the ground.
 Takeaway: As the body moves the arms and the arms move the club, the head should also begin to move away from the target, as indicated by some lateral motion in the template circle. At the same time, the hips haven't moved laterally and the right hip is staying inside the template line. There's no one part of the body taking control of the takeaway; it's a quiet motion powered by the proper pivot of the body. There should be no noticeable dragging of the club or excessive hinging of the wrists. The legs should act as a foundation. _Ê
 Halfway Back: The head has moved laterally in the circle and the right hip should now be inside the template line. This creates the proper movement of weight away from the target with the upper body, while creating the necessary room for the arms to work correctly as a result of the hip turn. The right forearm should still be seen above the left while the right shoulder moves behind the head. This shows the hands and arms have been passive in the takeaway, helping to get the club up on-plane while the shoulders continue to turn.
 At The Top: There's a noticeable space between where the right hip began and where it is at the top of the backswing. The head also has maintained its lateral drift at the top. These changes are critical to making a proper turn with the hips while moving the weight away from the target with the upper body. The clubshaft is still short of parallel to the ground, with the hands well away from the head, a sign of great width in the backswing. There's still space between the knees, indicating a quiet and stable lower body.
 Delivery: The left shoulder has now returned to its original location from setup as the upper body moves toward the target. The head also has begun to shift and is almost all the way back to its original position. The right hip has created even more space than it had at the top from its original line. A strong angle is still present between the left arm and clubshaft, illustrating stored energy. (Be careful not to create too sharp an angle here, as it will affect your accuracy.) Also, the body should be in a solid, stacked position.
 Impact: The head is just slightly behind its original position while the left shoulder is now closer to the target. This moves the hands directly under the left shoulder, creating a straight line between the left shoulder, arm and clubshaft at impact. Notice how the right hip is much closer to the target at impact than at setup. Moving the body into the correct position at impact puts the bottom of the swing slightly in front of the ball. This creates consistent contact between the club, ball and ground at impact.
 Release: The chest begins to pass the line originally occupied by the left shoulder while the head begins to move toward the target. This shows that the body is relaxed and the momentum of the club passing the body is pulling the body through to the finish. The body remains stacked up, with the right side of the torso from the shoulder to the knee still perpendicular to the ground. This eliminates any tendency to create a reverse C and cause possible injury to the back.
_Ê
Release: The chest begins to pass the line originally occupied by the left shoulder while the head begins to move toward the target. This shows that the body is relaxed and the momentum of the club passing the body is pulling the body through to the finish. The body remains stacked up, with the right side of the torso from the shoulder to the knee still perpendicular to the ground. This eliminates any tendency to create a reverse C and cause possible injury to the back.
_Ê
PGA Professional and Golf Tips_¨ Senior Instruction Editor Brady Riggs is the Director of Instruction at Woodley Lakes Golf Course in Van Nuys, Calif.

Sleeping Bag Maintenance and Care Tips for Beginners

Copyright © www.mycheapnfljerseys.com Outdoor sports All Rights Reserved